This month I have the opportunity to be a Guest Designer for Taylormadecards4u and I got to work with her Office Passport Kit.
This is the Office Passport kit
Here is a picture of my finished mini junk journal.
I printed off 2 copies of Monica's Office Passport Kit because I wasn't sure just how much embellishing I was going to do. After I cut out all the pieces and inked the edges, I cut out a piece of cardstock at 8 1/2 x 5 1/2.
I decided to use the key print paper to cover the front and back of my journal. Then I used the ledger paper to create pockets in the inside front and back panels.
After that, it was time to cut, fold and stack some papers for the inside of my journal. I used some coffee dyed paper, some ledger paper and some graph paper as well as a small paper bag that I had in my stash. The photo above shows how I held all of my papers together in preparation for sewing the signature into the cover.
After the signature was attached to the cover, I played around with some embellishing. I didn't decorate every page because ultimately I wanted to have room to take notes, etc.
Here's a flip through of my finished mini junk journal
Inside front cover pocket with some ephemera and first page with flip up created from a ticket and torn piece of paper layered under.
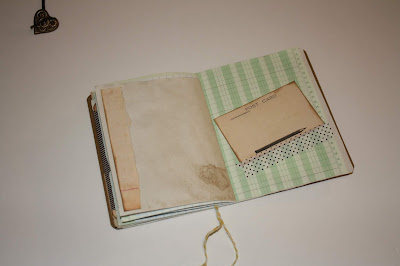
Right page has a journal card attached with some washi, piece of ephemera layered underneath and a tab stapled to the journal card.
This photo shows the journal card flipped over. Plenty of room for note taking or doodling.
I made a journal card out of the ledger paper and attached it with some washi to make a flip out.
I cut a scalloped circle from the collage paper and stapled it down to create a tuck spot.
I added this fun yellow striped paper sack to the center of the signature as a place to place receipts, business cards or maybe even a memento. On the opposite page I stapled down the journal card with the keys to make another tuck spot.
On the back side of the previous page, I added a pocket that I tore from the collage paper to cover my staples from the other side. I also used one of the journal cards and wrapped some wash around it so that I would always have some washi to attach things or just to play with.
Here I added a strip of paper that I tore from the ledger paper and on the opposite side I added the small postcard and taped it on the bottom to create a flip down.
On the left I tore a strip of paper and added some washi to the top to create a fun cluster to decorate the page. On the right I added one of the tickets and some washi (can you tell that I like to play with washi?)
Inside the back cover I tucked some more of the ephemera into my pocket. I was sorely tempted to keep on decorating, but I really wanted too keep my mini junk journal light and manageable, plus I consider it a bonus that it actually closed.
For a touch of fun, I tied a couple of key charms to the tails of my binding cord. For a closure, I tied a piece of elastic through the holes of this fun steampunk heart button. You lay the button on top, wrap the elastic around the journal and then pull the loop over the button. This closure is really fun and secure.
That's all that I have for you today. Thank you so much for stopping by and I can't wait to begin sharing more projects with you.
Robin


Wonderful project Robin. Welcome to the team.
ReplyDeleteThat's alotta real estate in a tiny package! It looks like you slipped right back into papercrafting with no problem! ♥
ReplyDelete